Make it a musical May! Every May (sometimes every March if the year is shorter) I plan to show a musical to all of my classes. Many students are not exposed to musicals at home and this is a great time to introduce them to a genre they may just fall in love with!
Top 5 Reasons to Have a Musical May
1. Most students are not familiar with traditional musicals and introducing your students to them now can create a life long love of musical theater.
2. It's May. It is possible that your schedule is just crazy with rescheduled classes from testing, field trips, assemblies, end of the year dodge ball tournaments or whatever. Musical May is a great way to give your kids awesome musical content with little prep and maximum flexibility.
3. It doesn't really matter if you finish the musical or not. If you do, awesome. If you don't, encourage your students to finish the musical on their own.
4. It's a great excuse to try out some flexible seating options to see it is for you. Students can use rugs, cushions and other flexible seating options while watching the movie.
5. Musicals make people happy. Don't you need a little more happiness during what can be the most stressful month of they year?
How to Make Musical May Special
I like to promote Musical May during the last week of April with signs posted around the school. It's an easy and fun way to get students excited about it. Sometimes I'll include quotes from the movie too. For example before I showed "Seven Brides for Seven Brothers" I hung up this sign:
When Musical May (or March) begins, I create a mini bulletin board on my door to highlight it and post some general questions. These questions about the musical really spark some great discussions as students wait in the hall. Even teachers and staff members pop their heads in on occasion to see if they could remember the answers. Fun!
Sometimes I'll have a little snack for students during one of the times they visit my classroom for Musical May. At my local supermarket, they often have gigantic bags of popcorn for just a few bucks. One bag per class was usually more than enough and it made Musical March feel like an event. Another year (at a MUCH smaller school) I purchased ice pops for each class. They were inexpensive and the lovely ladies of lunch stored them in their freezer until I needed them. At another school I had an amazing PTO President that volunteered to come in every day for a week to pop enough popcorn for each student in music class. What a blessing!
Weekly trivia questions over the intercom can be another way to make Musical May a special event. Read the question and then give students a few second to think about it before giving the answer or have them drop their answers in a bucket or can and draw a winner for a small prize at the end of the day.
How to Make Musical May Educational
I do several things to make Musical May educational. When working with third grade and up, they watch their musical with a viewing guide. The viewing guides don't always focus on the musical aspects of the story, but more on setting, plot and interpreting the lyrics and motivations of characters.
When the musical is finished we may play a melody from the musical on Orff instruments, sing a song from the musical, write a parody of one of the songs or even write our own review of the musical. Older students enjoy creating slideshows that show the history of the musical too.
With younger students, we watch the musical for part of the period and then do an activity from one of my sets. They may write about a character or a song or do a coloring sheet. They next time they come we will do the same thing. We will watch the musical for most of the period and then do a short activity related to it. I have found that this works best for younger learners.
Right now I am teaching 3rd, 4th and 5th grades so I do. When I taught K-8 I showed two different musicals. One for the lower grades and one for the upper grades.
Do your admins support this?
You bet. I show them the worksheets and other activities that we will do with the musical and they are all on board. Sometimes they'll sneak in to watch them too!
Do you need special permission to legally show a movie in class?
Yep. In all likelihood, your district or building already has one. Learn more about copyright for schools here.
Do you show the whole movie or just clips? It really depends on many factors. The group I am showing it to, the amount of time I have to celebrate Musical May and the length of the musical are all things I take into consideration. As a general rule, yes. I try to show the entire musical.
I hope that these ideas help you have a happy Musical May! If you liked these ideas,
I'm a gadget girl. I have always been a gadget girl. My heart leaped the first time I saw the Makey Makey in action and I knew I had to give it a try. Makey Makey is an electronic invention too. It allows you to connect everyday objects to computer programs. It uses a small circuit board, alligator clips and a USB cord to connect to your computer and the objects you choose. Essentially it is creating an electric circuit and sends closed loop electrical signals to the computer. The computer responds in virtually any app because the Makey Makey uses mouse clicks and key strokes.
So what, right? Well did I mention that it can connect to simple percussion and piano apps? This let's you essentially play the piano on bananas, Play-Dough or even hot dogs. FUN! The Makey Makey can allow your students create new "instruments" to play with every day objects.
The Makey Makey comes with instructions that are ridiculously easy to follow so I won't go into a step by step. Basically you plug the USB cord into the Makey Makey and your computer. You connect yourself to earth (which is a section on the circuit board) and then you connect the circuit board to some other object. You can choose any of the arrow keys, space bar or click. When you touch the everyday object (like a banana) you complete the circuit and the computer receives the command.
Actually, you can connect to much more than just those basic six. If you turn the circuit board over there are more options. I have played with this advanced option but I haven't used it with students yet. One of my struggles with STEAM lessons is that my students don't always have the tech skills that they need to complete projects like this. To ensure student success, I have to plan time to teach the technical skills they will need and THEN we can focus on the musical part.
In a perfect world, students would already have experience with the Makey Makey and understand the basics of how it works. They would have experimented with different objects to see what choices conduct electricity. They don't come to my classroom with these experiences under their belt. At least, most of them don't so I take the time to teach them about the science and the technology portions of this lesson.
I have created a few mats for students to use. They contain the same notes as the Makey Makey piano. I place some simple song sheets with them and students can play songs on marshmallows, hot dogs, gummy worms, etc...
After students are able to use the Makey Makey, the next step is to set them free! Inspire students to compose a simple melody based on the objects they have connected to the computer. For example you might challenge students to compose a melody with the Makey Makey connected to spoons and then also create a percussive ostinato on more spoons to play with it. My students always love creating punny titles for their composition. I imagine this one might be "SPOONlight Sonata" or "The Spoon Tune".
Here are a couple of my favorite ideas:
This composition was based on a Play Dough keyboard. They used different colors of dough and formed them into different shapes and then connected the Makey Makey. They used stick notation to indicate how many times to play each pitch. The title is "Dough a Deer, A Playdo Deer".
Can you guess what this composition was played on? Gummy bears! I love that they included a key at the bottom of their composition.
The set that I have for the Makey Makey in my TpT store has 3 task cards for getting the Makey Makey setup and trying it out, 3 different staff and keyboard displays (I laminate these and students set their objects on the note they will play.), 4 simple songs and a workstation sign. You can download it HERE.
You can find more information about the Makey Makey on their website. If you liked these ideas, PIN them for later:
Found Sounds Workshop has always been one of my favorite ways to teach about the science of sound. Actually, this magic little box is more than just a toy box. It is part of a larger, more comprehensive project that can end with instrument design and construction.
To begin, I collected many different items from around my classroom and home. I made sure these items would be safe to use in the classroom, made an interesting sound and were not valuable items. In considering safety I did not include forks, rubber bands or anything with a sharp, pointy edge. I didn't include anything valuable because kids break stuff.
I also purchased a few items from the dollar store because I wanted them to be new. For example, the scrub brush is a great addition to the Found Sounds Box, but a dirty one would not be fun! I also purchased a couple of cheese graters (that were not very sharp) and some gum in a plastic wrapped container. Every thing else was found at home or school.
I wanted to make sure that I included 4 types of items: shakers, strikers, scrapers and mallets.
Shakers: gum or candy containers in their plastic wrapping, cups of ramen noodles, Tic Tacs, a box of paper clips (that I taped closed) and keys on a key chain.
Scrapers: cheese graters, wire cups, beaded necklace, metal jar ring, scrub brush and combs.
Strikers: small lids from deodorant, spray paint, perfume bottles, etc..., tins and small boxes, miscellaneous containers, toys or pieces from toys and cups.
Over the years, I've used several different kinds of boxes to store my found sound objects. Right now I'm using a small file folder box. Plastic shoe boxes are a great size to start with.
Activities
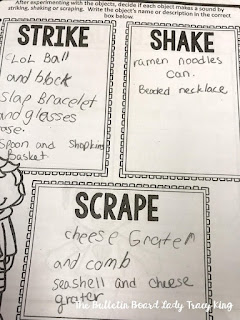
I most often use the Found Sounds Workshop as a workstation. Students can complete one activity in the time they have at this center. I have worksheets that ask students to categorize objects by how they make the best sound: strike, shake or scrape. Other worksheets as them to distinguish between pitch and unpitched, high and low and what material they are made of. Students love exploring the different objects in the box and often come up with some creative ideas for how to use them.
This activity works well with a variety of grade levels. With Kindergarten and 1st grade they often drew pictures of the objects than coming up with a name or description for them. My 4th and 5th graders were able to name (sometimes with great detail) the objects in the box.
After students have had an experience with classifying the objects in the box, the next activity is to create a composition and perform with their found sounds. I've experimented with this activity and discovered that it saves a great deal of time if I give them a framework that their composition can be created within. This includes a 16 block grid with room for writing/drawing their "instrument" choice. With some classes I chose to complete most of the grid for them so that they only have a few choices to make. This really is just a time saver, as students are able to complete the entire composition themselves. This ensures that everyone is ready for performance during the same class period.
The composition worksheets and all of the ones I've mentioned above are available for download HERE.
After students have completed the composition and have experience with what works best, it is time to create their own instrument by combining found objects. I've done this many different ways. If your school has a dedicated maker space, you may already have all of the raw materials that you will need. If not you'll want to send out requests to co-workers, parents and possibly some local factories for items your students can use for instrument construction. I have a large list of items that you can reproduce and send home with your students in the Found Sounds Workshop download in my TpT store.
One way to approach this project is to have students examine the materials that they have available to them and then sketch a design for an instrument. (I have them use a planning sheet during this part of the project.) Another way is to have them dream up a great idea, sketch it and make a list of needed supplies. Next, students find their supplies from your found sounds collections, recycle bins or from their homes. This way allows students the most creative experience but depending on students to bring in the needed supplies can cause problems.
In a small school district that I worked in, I had students complete their instruments at home and bring them in to class. This was mostly successful, but it was quite obvious which students did the work and which students' parents did the work.
If you are interested in using the worksheets that I use, they are available for download HERE.
Scientific and technological innovations continue to become increasingly important in our every day lives. To succeed in our new information-based and highly technological society, students need to develop their capabilities so much more than what was considered acceptable in the past. As schools around the world focus on STEM initiatives, forward thinkers are looking to the arts to strengthen this focus to STEAM.
As music educators, how to we incorporate the idea of career readiness and technological proficiency in our lessons? How do we provide problem solving, project based learning activities when we see our students one time a week for 50 minutes? I must admit that I don't know all of the answers. I'm about to embark on a STEAM journey and am inviting you to join me. I'll be sharing some of my ideas for incorporating science, technology, engineering and math into my classroom.
I picked up my first set of StikBots at Target months and months ago. I had a few ideas about what I wanted to do with them and then life happened and they just sat on a shelf looking at me with their half-smiles, waiting for me to pick them up. When I did, I was delighted with how easy they were to use!
The studio pack comes with two StikBots, a simple tripod and a green screen stage. I sat it up in just a few minutes and downloaded the app for my phone. I was creating my first stop animation video before I knew it! If you would rather not just jump in, you might like to watch this Stikbot tutorial I found on YouTube.
Although the StikBot figures are an obvious choice for creating your videos, you can actually use anything! Barbies, figurines, LOL dolls, stuffed animals, action figures are great. Be creative! Try salt shakers, rocks, Play Dough blobs, shoes or whatever you want!
For class I chose to use the Stikbots because it eliminated one of the decisions that that students would need to make and it created the same experience for each group. Due to limited time, I had to plan for students to be able to find success in creating a video with as few choices as they could. With more time, allowing them to choose different characters or even creating their own would be an excellent addition to these lessons.
I had enough sets of the studio packs to divide my students into several groups. I also had enough old phones with wifi that I could bring in on the days we worked with StikBots. I've sent out a few requests to friends and family members for old phone donations. I hope to get enough so that I don't have to bring mine in each time I want to use them. If your students are allowed to use their own phones at school you may have a student volunteer to use their phone and just message or email their video to you when they are finished.
With minimal instruction, here's a video my 6 year old daughter made in just a few minutes.
When using Stikbots with students, their first experience with them is learning how to use them. They can create any kind of video with them. We take enough shots for a 9-15 second video. This doesn't sound like much, but it takes quite a few photos of slightly different moves to create a video of this length. I want students to understand how much they need to move the Stikbots and I want them to experiment and make mistakes. Sometimes the best way to gain understanding is to make many mistakes and keep going!
After students have taken all of the shots they need, they can view their video and discuss things that need improving and things that worked well. The next project that they do, they can include a background and music. There are several different backgrounds included and there are also a few music tracks that work well with a variety of scenes.
This video uses one of the Stikbot animal characters and a picture of the elementary school outside my front window.
So, what can students use Stikbots for in music class? Here are a few ideas:
1. Demonstration of an original dance they have created.
2. Demonstration of movement concepts like time, space, flow, shape, levels, pathways and more.
3. Demonstration of a folk dance or play party game.
4. Choreography for a song they are working on in class.
5. Commercial and jingle for a teacher given scenario. (Create a commercial and jingle to sell product X.)
6. Music advocacy videos for promoting MIOSM
7. Composer interviews. (You can purchase sticker packs for the Stikbots or add your own details to them to create the composer of your choice.)
8. Tips on performance posture.
9. Music Theory Hour -discuss an element of music.
10. Write a parody and create a video for it. (Try this parody writing kit.)
There are SO many possibilities for using Stikbots in music class. If you've tried it, I would love to learn how you are using them!
My students love Boomwhackers and so do I! Like most of you when I first got mine (many years ago!) I put them all in a bucket and then in a big rope handled tub when my collection grew. This caused a bit of confusion and chaos when I had students get a specific tube out of the tub. In this post I'll share some of my favorite ways to store Boomwhackers. Links in this post are not affiliate links.
My first attempt at organized Boomwhacker storage was to recycle plastic coffee cans. I spray painted them, added labels and sorted the Boomwhackers by pitch. This worked great on my instrument shelf near the window. I loved the way they looked. I think if I try this again that I might try painting the cans to match the Boomwhacker colors. That would be a little bit more of an investment, but I bet it would look great!
Read this blog post about how I made this storage and download some free labels for your classroom.
In my current classroom I don't have much space for horizontal storage. What I do have a lot of is wall space! I purchased these plastic bag storage containers from IKEA and attached them to the wall under my white board.
They fit well and look great! I may add labels to them at a later date, but right now I like the way they look without labels. They are easy for the students to access and are in a great place for a Boomwhacker workstation.
Christine Skog at Elementary Etudes used over the door shoe organizers to create an inexpensive and beautiful display. Check out her tutorial HEREto see how to make your own.
Jena Hudson at Sew Much Music used some available wall space to create a beautiful and functional way to store Boomwhackers. Her secret? Velcro! Check out this post to learn more.
I've always thought that these crates or an empty wine box would also make great storage options for Boomwhackers. I haven't tried them yet, but I think they have potential!