Header

Mrs. King at Home About Mrs. King Contact Mrs. King Mrs. King's Music Class HOME Image Map
Showing posts with label Summer Project Sundays. Show all posts

DIY Canvas Art for Your Classroom

Learn how to create your own canvas art for your home or classroom with supplies you already have!  Works with any theme and doesn't take long to complete.

I am always on the lookout for inexpensive and crafty ways to decorate my home and classroom.  Today I'm going to share with you one of my favorite ideas!  I guess I somehow aspire to be an artist of sorts and I definitely want my kids to have plenty of experience with art.  I picked up a several packages of blank canvas a couple of months ago when Joann's had it marked ridiculously low.  I didn't really have a specific idea for them but I figured that I would end up needing more!

Learn how to create your own canvas art for your home or classroom with supplies you already have!  Works with any theme and doesn't take long to complete.

I am still working on my classroom theme for next year but I know for sure that it will be colorful.  I love mixing rainbow patterns with black and white patterns and am sure that will show up in my classroom.  I took three 12x12 canvases and drew a curvy staff on them with a permanent marker.  If you were decorating another classroom you could add numbers, the alphabet, equations, beakers, various sports equipment, etc....really anything you want. 

Learn how to create your own canvas art for your home or classroom with supplies you already have!  Works with any theme and doesn't take long to complete.
I went over my lines a couple of times so that they were quite dark.  I may use a black paint pen next time to see if that makes a difference.  Next?  Color!

Learn how to create your own canvas art for your home or classroom with supplies you already have!  Works with any theme and doesn't take long to complete.

Just take crayons to the canvas and color whatever you want.  My daughter is also a big fan of rainbows so she helped me complete the canvases.  We put books under the canvas for a firmer coloring surface.  After I photographed the canvases, I went back and colored the edges black.  I think that makes them look a little more finished and will look better hanging on the wall.
Learn how to create your own canvas art for your home or classroom with supplies you already have!  Works with any theme and doesn't take long to complete.
 The end result is colorful and perfect!  I'm tempted to hang it up at home!  I designed the canvases so they look like one piece, but you could design yours in any style.


 If you like this idea, PIN IT for later!
Learn how to create your own canvas art for your home or classroom with supplies you already have!  Works with any theme and doesn't take long to complete.


post signature

DIY Dry Erase Pockets

DIY Dry Erase Pockets – Learn how to create cute, colorful and durable dry erase pockets for less than 20 cents each!  You’ll love this easy to follow tutorial and your students will love using dry erase markers in class.  Save your classroom budget and save time at the copier.  This is a great teacher hack!

I am such a big fan of working in a paperless classroom.  It is not completely possible, but I love to find ways to save paper AND save myself from hours at the copy machine.  For the last 10 years or more I've been using lap packs.  Lap packs are copies of the treble staff in various sizes, a blank piece of paper and other sheets that I used every day in class.  I pop these into a thick page protector and students can use these with a dry erase marker.  Because I've copied everything on cardstock, they are firm enough to use without a clipboard or table.

This led me to thinking about other ways to save paper and eliminate stacks to grade.  If we are doing a simple assessment, I can walk around the classroom and quickly mark the seating chart with a score while students are working.  This is MUCH faster than grading stacks of paper.  I started using dry erase pockets for such activities.

You've probably seen the pockets on Amazon, Oriental Trading or even in the dollar spot at Target.  LOVE them, but since most of my classroom budget comes out of my grocery budget, I needed a less expensive option.  Project time!  I was able to make an entire classroom set for six dollars.  WAHOO!

DIY Dry Erase Pockets – Learn how to create cute, colorful and durable dry erase pockets for less than 20 cents each!  You’ll love this easy to follow tutorial and your students will love using dry erase markers in class.  Save your classroom budget and save time at the copier.  This is a great teacher hack!
Here's what you'll need:
Thick report covers (I like the kind with that little plastic binder edge that you slide on.)  This pack was $ .97 at Walmart.
Duct Tape -I prefer to use the smaller roll so that less of the cover is covered with the tape.  The larger rolls work, but may cover some of the sheets that you put in them.  You can also use clear packing tape.  It isn't as pretty, but it works well.  I had several rolls on hand as I assume most teachers do.
Scissors

DIY Dry Erase Pockets – Learn how to create cute, colorful and durable dry erase pockets for less than 20 cents each!  You’ll love this easy to follow tutorial and your students will love using dry erase markers in class.  Save your classroom budget and save time at the copier.  This is a great teacher hack!
I rolled the tape out flat so that I could set the report cover on it.  This let me line it up a little better than putting the tap onto the report cover.

DIY Dry Erase Pockets – Learn how to create cute, colorful and durable dry erase pockets for less than 20 cents each!  You’ll love this easy to follow tutorial and your students will love using dry erase markers in class.  Save your classroom budget and save time at the copier.  This is a great teacher hack!
Place the report cover so that it covers about half of the tape.  Fold the tape up to seal the edge.  Trim the edges with your scissors.

DIY Dry Erase Pockets – Learn how to create cute, colorful and durable dry erase pockets for less than 20 cents each!  You’ll love this easy to follow tutorial and your students will love using dry erase markers in class.  Save your classroom budget and save time at the copier.  This is a great teacher hack!

I only taped three of the sides (including the side that isn't open).  At the top I wanted to create a little flap so that my youngest learners would be able to load the pocket themselves.  Instead of running the tape all the way across, I just created a tab that is a couple of inches long on ONE piece of the report cover.  In this way, students can use the tab to open the pocket without my help.  It is much trickier than it seems for some of my younger students.

DIY Dry Erase Pockets – Learn how to create cute, colorful and durable dry erase pockets for less than 20 cents each!  You’ll love this easy to follow tutorial and your students will love using dry erase markers in class.  Save your classroom budget and save time at the copier.  This is a great teacher hack!
LOVE the way they turned out!  I popped some handwriting sheets in so my daughter could try them out.  They were definitely easy to use and pretty durable.  I had tried using page protectors for this project but did not like that they had holes in them.  The holes are for using in a binder, which is handy, but my students liked to poke their pencils in the holes and they tore and looked bad.  The report covers keep this from happening.  

DIY Dry Erase Pockets – Learn how to create cute, colorful and durable dry erase pockets for less than 20 cents each!  You’ll love this easy to follow tutorial and your students will love using dry erase markers in class.  Save your classroom budget and save time at the copier.  This is a great teacher hack!
I like to use these small dry erase markers that have an eraser on the end.  When I don't have them available for workstations I put regular dry erase markers and paper towels or cotton balls there for students to use to erase.
DIY Dry Erase Pockets – Learn how to create cute, colorful and durable dry erase pockets for less than 20 cents each!  You’ll love this easy to follow tutorial and your students will love using dry erase markers in class.  Save your classroom budget and save time at the copier.  This is a great teacher hack!

I've seen teachers that hot glue a pom pom on the end of the dry erase marker lid and students use those for erasers, but haven't tried that.  If you have, I'd love to hear any tips or ideas you might have for keeping them usable all year.

DIY Dry Erase Pockets – Learn how to create cute, colorful and durable dry erase pockets for less than 20 cents each!  You’ll love this easy to follow tutorial and your students will love using dry erase markers in class.  Save your classroom budget and save time at the copier.  This is a great teacher hack!DIY Dry Erase Pockets – Learn how to create cute, colorful and durable dry erase pockets for less than 20 cents each!  You’ll love this easy to follow tutorial and your students will love using dry erase markers in class.  Save your classroom budget and save time at the copier.  This is a great teacher hack!

These worksheets are from my No Prep Music Worksheets -Summer.  They are great examples of worksheets that I would use in workstations.

DIY Dry Erase Pockets – Learn how to create cute, colorful and durable dry erase pockets for less than 20 cents each!  You’ll love this easy to follow tutorial and your students will love using dry erase markers in class.  Save your classroom budget and save time at the copier.  This is a great teacher hack!DIY Dry Erase Pockets – Learn how to create cute, colorful and durable dry erase pockets for less than 20 cents each!  You’ll love this easy to follow tutorial and your students will love using dry erase markers in class.  Save your classroom budget and save time at the copier.  This is a great teacher hack!


I hope you enjoy this teacher hack and can use it to save some money and create a more functional classroom! Enjoy!


post signature

My Bloomin' Pencil Problem and a Crafty Solution

Pencil problems in your classroom? This clever teacher craft may be just the pencil solution that you are looking for. Provide pencils for your students and brighten up your teaching space. Elementary, high school or even in the main office, this handy DIY idea will be popular.

In twenty years of teaching I think that I must have tried twenty thousand different ways to protect my pencil stash.  Once I even bought pencils that said "Stolen from Mrs. King".  My high school kids took it as a challenge.  I've never lost pencils faster than I did that year!

I supply my own pencils because as a music specialist, it can sometimes be a hassle to have students bring a pencil to class.  They forget or I forget to remind them.  Sometimes when they remember they bring an entire pencil box full of everything but the kitchen sink.  It is just easier for me to have my own stash.  That being said, the pencils come out of my grocery budget so I always want to keep them as long as possible.

One of the solutions I loved the most was to turn the pencils into classroom decorations.  It isn't the perfect solution, but it might be the prettiest!  When turning the pencils into flowers you give up the ability to use the eraser.  This actually works really well because the erasers usually only last about two weeks anyway.  (If I am lucky!)  I always have a small tub of erasers that students can use if they need them.

With the flower pot pencils, Once they are sharpened to the green, I retire them from the flower pot and put in a pencil can.  About mid-year (or whenever all my flowers have been used up) I'll whip out the can of used pencils that magically have FULL erasers!  With this can of pencils and a hope and a prayer I can coast right into summer!

So, let me introduce you to an old project to introduce you to my newest project.
Pencil problems in your classroom? This clever teacher craft may be just the pencil solution that you are looking for. Provide pencils for your students and brighten up your teaching space. Elementary, high school or even in the main office, this handy DIY idea will be popular.

A few years ago  I painted several flower pots with a keyboard theme.  I stuffed them with flowers and put them on a shelf in the teacher corner of my classroom.  They made me smile each time I saw them!  After a couple of years, I decided to retire them.  Now, they hold my bloomin' pencils.

Pencil problems in your classroom? This clever teacher craft may be just the pencil solution that you are looking for. Provide pencils for your students and brighten up your teaching space. Elementary, high school or even in the main office, this handy DIY idea will be popular.
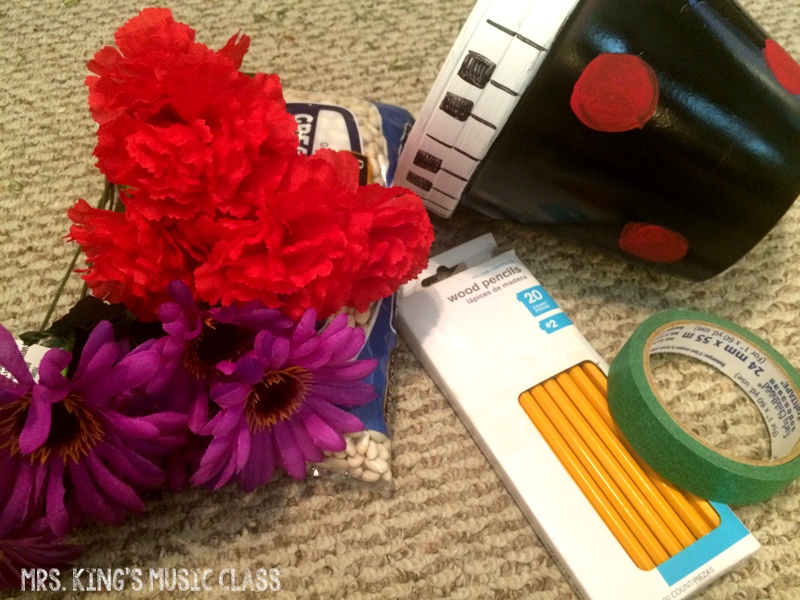
For this project, you'll need a flower pot (painted or not), some fake flowers a pack of dried beans, green masking tape or floral tape and pencils.

Pencil problems in your classroom? This clever teacher craft may be just the pencil solution that you are looking for. Provide pencils for your students and brighten up your teaching space. Elementary, high school or even in the main office, this handy DIY idea will be popular.

The green floral tape works really well, but for this batch I only had green masking tape, so that is what I used.  I snipped the individual flowers from the bundle and using the masking tape adhered them to the pencils.

Pencil problems in your classroom? This clever teacher craft may be just the pencil solution that you are looking for. Provide pencils for your students and brighten up your teaching space. Elementary, high school or even in the main office, this handy DIY idea will be popular.
Put a couple of pieces of tape over the hole in the bottom of the flower pot and fill with dried beans.

Pencil problems in your classroom? This clever teacher craft may be just the pencil solution that you are looking for. Provide pencils for your students and brighten up your teaching space. Elementary, high school or even in the main office, this handy DIY idea will be popular.
The beans hold the pencils up so that they look like a bouquet of flowers and they are gentle on the lead so that it doesn't break each time a pencil is replaced.

Pencil problems in your classroom? This clever teacher craft may be just the pencil solution that you are looking for. Provide pencils for your students and brighten up your teaching space. Elementary, high school or even in the main office, this handy DIY idea will be popular.

If you look closely in the picture above, you'll notice that a few pieces of the masking tape are starting to curl up a bit.  This happens with the floral tape too.  I secure them with a piece of clear, Scotch tape and they stay put.

Pencil problems in your classroom? This clever teacher craft may be just the pencil solution that you are looking for. Provide pencils for your students and brighten up your teaching space. Elementary, high school or even in the main office, this handy DIY idea will be popular.

This finished product is a bright and cheery addition to your classroom and a solution for your pencil problem!  Eventually I moved the flower pots to several places around my classroom.  This made it easier for students working at workstations to have supplies close to them.  It also looked pretty!

Pencil problems in your classroom? This clever teacher craft may be just the pencil solution that you are looking for. Provide pencils for your students and brighten up your teaching space. Elementary, high school or even in the main office, this handy DIY idea will be popular.


Pencil problems in your classroom? This clever teacher craft may be just the pencil solution that you are looking for. Provide pencils for your students and brighten up your teaching space. Elementary, high school or even in the main office, this handy DIY idea will be popular.

post signature

Note Toss Workstation

Music Workstation FREE download – Note Toss.  Learn how to create this DIY music center with a few easy materials.  Your students will love playing this game in your classroom and you’ll love their excitement at reviewing note values.  This workstation can be altered and used for math facts and reading too!  Let’s get crafty!

Sometimes inspiration comes out of nowhere.  Sometimes it comes from the clearance aisle at Walmart.  I was dashing in to pick up a prescription, some cream cheese won tons and the largest bandages I could find (don't ask!). That is when I saw them.  Honestly, I didn't even know what they were, but the clearance tag was calling my name.

Music Workstation FREE download – Note Toss.  Learn how to create this DIY music center with a few easy materials.  Your students will love playing this game in your classroom and you’ll love their excitement at reviewing note values.  This workstation can be altered and used for math facts and reading too!  Let’s get crafty!
These are cardboard clay holder stands.  It turns out that these sturdy little stands hold the clay birds used for shooting practice.  They are normally 6-8 bucks.  Check them out here.  I looked at them and knew exactly what I wanted to do!  I would create a tossing game and use it in a workstation.

Music Workstation FREE download – Note Toss.  Learn how to create this DIY music center with a few easy materials.  Your students will love playing this game in your classroom and you’ll love their excitement at reviewing note values.  This workstation can be altered and used for math facts and reading too!  Let’s get crafty!

Next, I needed something that I could toss into it that met this criteria:
1.  Would fit through the holes with a moderate amount of success even for a bad thrower like me.
2.  Would cause minimal to no damage to the stand, my classroom or another person.  (You never know.)
3. Would be cheap and pretty.  (My two favorite ways to decorate my classroom.)

I tried tennis balls and golf balls.  (Right size.  Too hard.)  I tried some little bouncy balls.  (Too bouncy.)  I tried a rolled up pair of socks.  (That might have been just for fun.)  I also tried a few miscellaneous balls I found in the kids' rooms.  Nothing was just right.  This necessitated a trip to Target, The Dollar Tree, Party City and Hobby Lobby.  Okay...don't tell my husband but I went to a couple of extra places just because. 

What I found were these colorful Wiffle balls at Hobby Lobby.  The tag says "Play Balls" and they are made of a light, durable plastic.  Perfect.
Music Workstation FREE download – Note Toss.  Learn how to create this DIY music center with a few easy materials.  Your students will love playing this game in your classroom and you’ll love their excitement at reviewing note values.  This workstation can be altered and used for math facts and reading too!  Let’s get crafty!

Next, I painted the clay holder stand a lovely shade of purple.  I added the white around the cut-outs because I wanted a little more contrast to help students aim.
Music Workstation FREE download – Note Toss.  Learn how to create this DIY music center with a few easy materials.  Your students will love playing this game in your classroom and you’ll love their excitement at reviewing note values.  This workstation can be altered and used for math facts and reading too!  Let’s get crafty!

I had a game in mind.  Actually, I've had a game sheet made up for a game that I've used that is similar to this.  I tweaked it just a little and you can download that at the end of this post.  For this game, I needed to mark each circle with a note or rest value.  Wanting to use this with the most grade levels possible, I stuck with quarter note, half note, dotted half note, whole note, barred eighths and a quarter rest.

Music Workstation FREE download – Note Toss.  Learn how to create this DIY music center with a few easy materials.  Your students will love playing this game in your classroom and you’ll love their excitement at reviewing note values.  This workstation can be altered and used for math facts and reading too!  Let’s get crafty!

Next, I added little color coding dot stickers with the note and rest values.  I chose these little stickers for a couple of reasons.  They are inexpensive and easy to remove or replace.  Since I could imagine this game working for multiple grade levels and multiple subjects, I wanted to make sure that whatever I used was versatile.   I think that with my next one I may upgrade and buy some chalkboard labels to use.

Music Workstation FREE download – Note Toss.  Learn how to create this DIY music center with a few easy materials.  Your students will love playing this game in your classroom and you’ll love their excitement at reviewing note values.  This workstation can be altered and used for math facts and reading too!  Let’s get crafty!

To play, students use one score sheet per team.  They take turns tossing the balls into the circles that will earn them the most points.  They write down the note that they hit and its value on the score sheet.  At the end of the game, they tally their scores.  The winner is the player that has the most number of points.

When placing this in a center and giving instructions, I think that it may be necessary to let students toss until they make it or give them at least 3 tries before moving on to the next student.

From our experimentation, about three feet away was a good distance.  This provided a good amount of success, but wasn't too easy.  You may find with older groups that you can get away with putting your tossing line a little farther back.

Music Workstation FREE download – Note Toss.  Learn how to create this DIY music center with a few easy materials.  Your students will love playing this game in your classroom and you’ll love their excitement at reviewing note values.  This workstation can be altered and used for math facts and reading too!  Let’s get crafty!

This idea could be used for a variety of subjects and activities.  By simply using numbers, this activity could be used for an addition or subtraction workstation.    Add the consonants b, c, f, h, p and s and have students toss and write the "-at" word family words.  The possibilities are endless.


 You can grab a free download of the score sheets that will work for this specific game.  Included are 4 version.  Two of the versions have a key at the bottom to remind students of how many beats each note or rest gets.  Two of the versions use the rest as a negative number that takes a point away from their total.

Note Toss Blog Exclusive Freebie by Tracy King


Music Workstation FREE download – Note Toss.  Learn how to create this DIY music center with a few easy materials.  Your students will love playing this game in your classroom and you’ll love their excitement at reviewing note values.  This workstation can be altered and used for math facts and reading too!  Let’s get crafty!
I hope you love this project and get much use out of it in your classroom!
post signature

Singing Rocks

How to Make and Use Singing Rocks (also known as story stones) by Tracy King  An easy DIY tutorial for making singing rocks or story stones to teach storytelling, sequencing, improvisation and even OPERA!  Great for many themes including: fairy tales, Bible stories, camping, outer space, ocean, Peter and the Wolf, Carnival of Animals and more.  No paint pens or Sharpies are needed for this great teacher craft!
Introducing Singing Rocks!  You may have seen these around the teaching world called "story stones".  Essentially these are rocks that you can use to teach storytelling, practice opera singing or explore improvisation.  In this post I'll walk you through how to make them even if you have ZERO artistic skills and we'll explore some ways that you can use them in your classroom or at home with your children.

How to Make and Use Singing Rocks (also known as story stones) by Tracy King  An easy DIY tutorial for making singing rocks or story stones to teach storytelling, sequencing, improvisation and even OPERA!  Great for many themes including: fairy tales, Bible stories, camping, outer space, ocean, Peter and the Wolf, Carnival of Animals and more.  No paint pens or Sharpies are needed for this great teacher craft!
 This is the collection that my daughter and I made.  It contains enough characters, animals, places and icons for many known stories and a limitless number of improvised stories and songs.

How to Make and Use Singing Rocks (also known as story stones) by Tracy King  An easy DIY tutorial for making singing rocks or story stones to teach storytelling, sequencing, improvisation and even OPERA!  Great for many themes including: fairy tales, Bible stories, camping, outer space, ocean, Peter and the Wolf, Carnival of Animals and more.  No paint pens or Sharpies are needed for this great teacher craft!
You'll need some smooth rocks (any color) that are an 1-3 inches big on at least one side.  I purchased smooth tiger rocks from the craft section at Wal-Mart.  They also had some great river rocks, but at my local store they only came in a very large bag.  You could also collect your own rocks from the river or maybe even your own yard.  Make sure they are clean and dry.

For this project I chose to use Mod Podge.  I love Mod Podge almost as much as I love my laminator and you know I LOVE my laminator.  Anyway...where was I?  Oh! Yeah...Mod Podge.  Awesome.  Get some.  You'll also need a small foam brush or two.

If you are not a fan of Mod Podge, you can use Elmer's School Glue and just water it down a little bit.  You'll need to allow a bit of extra drying time with the glue.

How to Make and Use Singing Rocks (also known as story stones) by Tracy King  An easy DIY tutorial for making singing rocks or story stones to teach storytelling, sequencing, improvisation and even OPERA!  Great for many themes including: fairy tales, Bible stories, camping, outer space, ocean, Peter and the Wolf, Carnival of Animals and more.  No paint pens or Sharpies are needed for this great teacher craft!

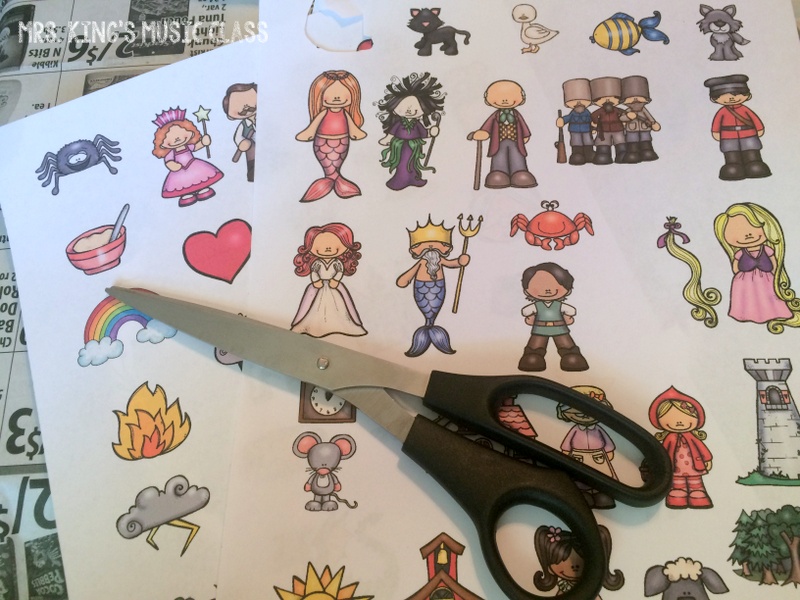
Next, decide what pictures you'd like to have on your rocks.  I would love to tell you that I measured each rock and then sized my clipart to fit it perfectly, but...uhm...no.   I chose to walk on the wild side and just sized them small and then found a rock that would match them later. 

I don't have downloadable sheets for the characters as they are essentially just clipart in a document and that would violate the terms of use of any clipart artist.  Instead, let me refer you to the amazing Educlips store to purchase some of her AMAZING clipart!  Most of the images you see above are from her creative mind.

If you are artistic you could use paint pens and/or permanent markers to create your Singing Rocks.

How to Make and Use Singing Rocks (also known as story stones) by Tracy King  An easy DIY tutorial for making singing rocks or story stones to teach storytelling, sequencing, improvisation and even OPERA!  Great for many themes including: fairy tales, Bible stories, camping, outer space, ocean, Peter and the Wolf, Carnival of Animals and more.  No paint pens or Sharpies are needed for this great teacher craft!

Now it's time to get busy!  Cut out each of the images.  I chose to leave a thin white border on most of them, but you can trim them as close as you have the patience to do so.

How to Make and Use Singing Rocks (also known as story stones) by Tracy King  An easy DIY tutorial for making singing rocks or story stones to teach storytelling, sequencing, improvisation and even OPERA!  Great for many themes including: fairy tales, Bible stories, camping, outer space, ocean, Peter and the Wolf, Carnival of Animals and more.  No paint pens or Sharpies are needed for this great teacher craft!
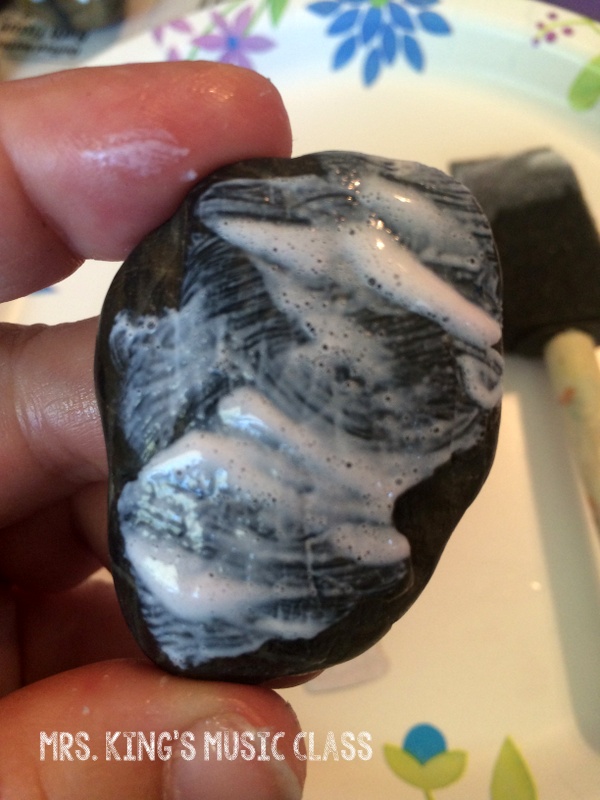
After you have selected a rock to match your cut out image, liberally apply the Mod Podge.  It doesn't have to be perfect.  You'll smooth it out later.  The rocks are usually not perfectly smooth so some adhesive may pool up here and there a bit.  No worries.  It will dry clear.

How to Make and Use Singing Rocks (also known as story stones) by Tracy King  An easy DIY tutorial for making singing rocks or story stones to teach storytelling, sequencing, improvisation and even OPERA!  Great for many themes including: fairy tales, Bible stories, camping, outer space, ocean, Peter and the Wolf, Carnival of Animals and more.  No paint pens or Sharpies are needed for this great teacher craft!
Next, lay your character on the rock and smooth out any bubbles or wrinkles with your brush.  I used my fingers, but remember?  I was totally walking on the wild side.  I was also working with a 4 year old and her standards are much lower than professional crafters.  

How to Make and Use Singing Rocks (also known as story stones) by Tracy King  An easy DIY tutorial for making singing rocks or story stones to teach storytelling, sequencing, improvisation and even OPERA!  Great for many themes including: fairy tales, Bible stories, camping, outer space, ocean, Peter and the Wolf, Carnival of Animals and more.  No paint pens or Sharpies are needed for this great teacher craft!

Next, cover the cut out with more Mod Podge or your glue mixture.  Smooth out any additional bubbles or wrinkles and them set it aside to dry.  After it dries, if you notice any edges that stick up or might be easy for a bored child to peel up, add another layer of Mod Podge and let it dry again.

How to Make and Use Singing Rocks (also known as story stones) by Tracy King  An easy DIY tutorial for making singing rocks or story stones to teach storytelling, sequencing, improvisation and even OPERA!  Great for many themes including: fairy tales, Bible stories, camping, outer space, ocean, Peter and the Wolf, Carnival of Animals and more.  No paint pens or Sharpies are needed for this great teacher craft!

What to Do with Your New Singing Rocks

My daughter is a singer.  She sings constantly.  She wakes up singing.  She implores us to let her spend the night at grandma's house in song.  She sings when she's hungry or bored or happy and she even sings when she's sad.  *cue Daniel Tiger's "It's Okay to Feel Sad"*  She also loves to make up stories  to pass the time in the car or a rainy afternoon.  So what do we use these rocks for?  OPERA!

Don't panic at the mention of the word "opera".  I can promise you that this kind of opera is easy to love!  When most adults think of the word "opera" they picture something like this:

How to Make and Use Singing Rocks (also known as story stones) by Tracy King  An easy DIY tutorial for making singing rocks or story stones to teach storytelling, sequencing, improvisation and even OPERA!  Great for many themes including: fairy tales, Bible stories, camping, outer space, ocean, Peter and the Wolf, Carnival of Animals and more.  No paint pens or Sharpies are needed for this great teacher craft!

An opera is just a play that is sung instead of spoken.  It is ridiculously fun to make an ordinary story into an opera by singing it!  It doesn't have to rhyme.  It doesn't have to have a memorable melody (although most kids tend to find one they like).  Just sing!

With students I use a book like Chalk or Tuba Lessons.  These books have no words or very few words.  Students sing what they think is happening on each page.  I usually sing the story for a few pages and then ask students to sing about what happens next.  Even my grumpy 6th graders have loved this activity.

With Singing Rocks, the idea is the same.  Put the rocks in a bag or box that isn't easy to see into.  I've found that an empty tissue box works great for this!  Pull out a rock and start singing something about what you see on the rock.  Then, the next person pulls out a rock and continues the story by singing about what is on their rock.  Once your students have done this activity with you leading it, they can easily use Singing Rocks at a workstation.

How to Make and Use Singing Rocks (also known as story stones) by Tracy King  An easy DIY tutorial for making singing rocks or story stones to teach storytelling, sequencing, improvisation and even OPERA!  Great for many themes including: fairy tales, Bible stories, camping, outer space, ocean, Peter and the Wolf, Carnival of Animals and more.  No paint pens or Sharpies are needed for this great teacher craft!

In my collection, I've included several places that our characters could visit:  pond/lake, school, home, a tower, a castle, etc..  I've also included some icons like a moon, sun, heart and rainbow that could be used to represent emotions or actual events in a story.

How to Make and Use Singing Rocks (also known as story stones) by Tracy King  An easy DIY tutorial for making singing rocks or story stones to teach storytelling, sequencing, improvisation and even OPERA!  Great for many themes including: fairy tales, Bible stories, camping, outer space, ocean, Peter and the Wolf, Carnival of Animals and more.  No paint pens or Sharpies are needed for this great teacher craft!

Do you recognize these characters?  These are the characters from Peter and the Wolf.  I think a set of these rocks in little plastic bags would be so much fun to use when listening to the story of Peter and Wolf.  Use them to have students identify the characters that they hear.  For practical purposes, I would probably make a set for my classroom for about half of the group and then have them share.  

How to Make and Use Singing Rocks (also known as story stones) by Tracy King  An easy DIY tutorial for making singing rocks or story stones to teach storytelling, sequencing, improvisation and even OPERA!  Great for many themes including: fairy tales, Bible stories, camping, outer space, ocean, Peter and the Wolf, Carnival of Animals and more.  No paint pens or Sharpies are needed for this great teacher craft!

Who is this grand old lady?  Well she could be the grandmother from Little Red Riding Hood, or my aunt who came back from Timbuktu in "My Aunt Came Back" or quite possibly the little old lady who swallowed a fly.

How to Make and Use Singing Rocks (also known as story stones) by Tracy King  An easy DIY tutorial for making singing rocks or story stones to teach storytelling, sequencing, improvisation and even OPERA!  Great for many themes including: fairy tales, Bible stories, camping, outer space, ocean, Peter and the Wolf, Carnival of Animals and more.  No paint pens or Sharpies are needed for this great teacher craft!
I know this is going to sound crazy, but instead of singing stories, students could actually just tell stories.  I know.  Crazy, right?  Why talk when you could just sing?  Imagine the countless number of adventures that these characters could go on!  With a couple of additions, this set could be used for Carnival of the Animals.

How to Make and Use Singing Rocks (also known as story stones) by Tracy King  An easy DIY tutorial for making singing rocks or story stones to teach storytelling, sequencing, improvisation and even OPERA!  Great for many themes including: fairy tales, Bible stories, camping, outer space, ocean, Peter and the Wolf, Carnival of Animals and more.  No paint pens or Sharpies are needed for this great teacher craft!
Retell the story of Little Red Riding Hood with these stones.

How to Make and Use Singing Rocks (also known as story stones) by Tracy King  An easy DIY tutorial for making singing rocks or story stones to teach storytelling, sequencing, improvisation and even OPERA!  Great for many themes including: fairy tales, Bible stories, camping, outer space, ocean, Peter and the Wolf, Carnival of Animals and more.  No paint pens or Sharpies are needed for this great teacher craft!
Create a new adventure for this poor princess that has been trapped in a tower all of her life.  Explore the mysterious ocean with the Singing Rocks below.

How to Make and Use Singing Rocks (also known as story stones) by Tracy King  An easy DIY tutorial for making singing rocks or story stones to teach storytelling, sequencing, improvisation and even OPERA!  Great for many themes including: fairy tales, Bible stories, camping, outer space, ocean, Peter and the Wolf, Carnival of Animals and more.  No paint pens or Sharpies are needed for this great teacher craft!

So what can you do with Singing Rocks?

Improvise a story with the whole class by having one student start and then passing the Singing Rock bag to the next student and so on.
Reinforce the idea of opera by having students sing whatever comes to mind when they see the songs.
Practice syllable identification or note values by having students chart which pictures have 1, 2 or 3 syllables.  In music class have them chart which rocks match a quarter note, barred eighths or another pattern.
Tell a story and then have your kids write their story down using the Singing Rocks to guide them.  If you are working with a pre-reader (like my daughter) be their scribe and write it down for them.  Afterwards, have them illustrate their story.


Like this idea?  PIN IT!
How to Make and Use Singing Rocks (also known as story stones) by Tracy King  An easy DIY tutorial for making singing rocks or story stones to teach storytelling, sequencing, improvisation and even OPERA!  Great for many themes including: fairy tales, Bible stories, camping, outer space, ocean, Peter and the Wolf, Carnival of Animals and more.  No paint pens or Sharpies are needed for this great teacher craft!

What kind of projects are you working on this summer?  Link them up below!


Last year I spent my summer posting crafty projects that you may enjoy for your classroom.  You can see those posts HERE.   Join me this summer!
1.  Grab the Summer Project Sundays picture above.
2.  Link to this blog post.  
3.  Add your link below.  
I can't wait to see your projects!



post signature